

How To Draw A Skull Step By Step
Learn to Draw a Skull
Draw a Skull with Flowers in Pencil
In this mail service, we will describe how to draw a skull. The skull is a ubiquitous symbol, for many people, it is a reminder of imminent death.
So, if yous are wondering how to describe a skull past in graphite in this post, nosotros will outline and describe in detail several alternative methods.
How to draw a skull with flowers in pencil?
To draw a skull with flowers in pencil, you will need to interruption down the process of drawing the skull into several main stages:
- Draw Simple Basic Forms
- Illustrate the Bones Outline of the Skull
- Model the Nose Crenel and Jawline
- Outline of the Eye Sockets
- Faintly Draw the Roses
Let's figure out how to describe a skull. I am certain that many will like the image of a skull with roses. This is a powerful symbolic image -which evokes feelings of blackness romance or love unto the grave.
- Let's learn and suspension down the process of how to depict the skull into simple stages.
- Let'southward get down to business organization.
- Draw Unproblematic Bones Forms
- To begin permit the states start with the simplest underlying forms and shapes, depicting the configuration of the skull – a kind of sketch of the caput. In the hereafter, nosotros will reproduce our skull with roses. Using a elementary method that everyone can learn.
Outline the Basic Shape of the Skull
- Now we outline the lines of the time to come of the skull, draw a precipitous bend of the eyebrow. Yes, past the way, we portray it in the front end profile view.
Moving picture the Nose Crenel and Jawline
- Now, we denote the line of the nose in front profile. Terminate the drawing the chin on the auxiliary lines, reaching the temporal role.
- When drawing the jaws, use wavy lines to portray the oral fissure.
- Apply a niggling shading over parts of the nose and jaws, and so go to the 4th pace.
Outline of the Eye Sockets
- The adjacent step is to draw the outline of the eye socket and shade the centre. In the temporal region, we describe an indentation and apply tone.
- To describe the mouth, and add the details of the teeth. We will describe a serial of sharp teeth in the form of small arches.
- We outline the temporal part, the forehead and the jaws with a fatty line.
Faintly Describe the Roses
- We can say that most of the work nosotros have already done – the skull is almost gear up.
- We get-go to depict roses, and information technology is best to do this from the superlative of the head.
- The easiest style is to offset cartoon flowers with a cup shape, the prototype of which is later supplemented with bent petals.
- If yous are not satisfied with roses, you tin can depict whatever other flower.
Add Particular to the Rose
- Nosotros continue to sketch out roses. Add the petals, superimposing them on each other.
Draw the Stalk of the Rose
- Now become to the image of a long stem of a flower. Scheduled branches to portray a few leaves on a thin stalk.
Employ Tone or Colour to the Rose
- Our drawing is nigh ready. We finished painting one rose, let'southward draw one more than side, considering, according to belief, it is two roses that are carried to the cemetery. Now you can erase all the auxiliary lines and circle the resulting paradigm.
Eraser Auxiliary Construction Lines if Demand Be
- We erased all the auxiliary lines, and now our drawing is ready. It turned out a real masterpiece! It remains only to paint information technology. But this is up to you.
In this part of the tutorial, I will bear witness you how to draw a skull from scratch in stages. In this section of the article, I will explicate all the details of the cartoon procedure, with a focus on beginners. To brand your chore easier, draw a modest skull. This will permit your hand to use the same movements as when writing, therefore, it will exist easier to work. If y'all are wondering which are the all-time artist grade pencils please read my post, Best Pencils: For Cartoon, Shading, and Sketching.
Employ This Arroyo to Draw the Base of operations of the Skull
- To begin with, we draw a simple line. The length of the line depends on your preferences – the longer, the larger the cartoon volition be. If necessary, practise not be afraid to utilise the ruler.
- Find the centre of the line and depict a marker.
- Draw a separate line perpendicular to the previous one. Let it be a lilliputian longer than the first.
- We depict a copy of the get-go line on the opposite side, a cruciform shape is formed.
- Outside of this cross, we will now draw an oval. If you have difficulty drawing such shapes, go on as follows: Start with lite strokes between the two ends of the perpendicular lines. Then we describe a clear line along these lines. We can employ this technique and draw an oval.
- Find the center of the left quarter and dissever this side into vi equal segments.
- Using a bend, we connect 2 points through one.
- Nosotros split the previous line of another bend, forming a loop.
Practice this 10 Footstep Arroyo to Draw the Jaw
- We draw a short line down the middle of the oval.
- Put a mark on this line.
- Draw a horizontal line crossing the bottom bespeak.
- Next, we split up the right quarter of the oval into four segments.
- From the offset point, we draw a line downward.
- From the loop draw another line downwards parallel to the previous 1.
- Nosotros divide the terminal line into four segments.
- The eye point is intersected by a perpendicular line. Its length should be the aforementioned as the length of the segment that this line crosses. Note that this line is parallel to the longest line that divides the center of the oval.
- We circle the resulting symmetrical cross with a circle. To simplify the task, we use the circle drawing method we used for the oval.
- Close the jaw shape with two boosted lines.
Endeavor this 12 Step Arroyo to Describe Nose and Teeth
- Draw a pocket-sized circumvolve.
- The lower part of the circle from the previous section is divided into three segments.
- Through four points nosotros describe a curve.
- Depict a circle above the loop. In this identify, we volition describe a brow.
- From eyebrow to jaw depict a line.
- Between the loop and the countenance draw a nifty curve.
- Beneath the oval describe a line parallel to the long line crossing the oval.
- Under the countenance draw another bend. It will be the span of your nose.
- From the tip of the olfactory organ, we draw a line to the center of the circle on the jaw.
- The upper right part of the circumvolve on the jaw is divided into 3 segments.
- From the farthermost point on the circle draw a line to the lower curve.
- Nosotros describe three curved lines for the teeth.
Detail the skull
- Before you lot begin to add detail and shading to your drawing of the skull make sure that you have drawn the full general outline of the skull, which includes the eye sockets, olfactory organ, and teeth.
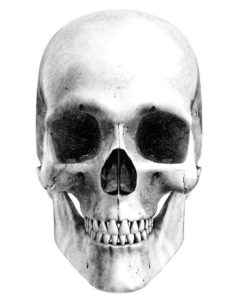
- To begin adding further detail it is a practiced idea at this phase to look at and refer to pictures of the skull to requite you some idea of how to apply the features.
- Continue to faintly sketch the details until yous are sure that you have fatigued all the master features.
- At this stage in your drawing begin to refine the areas around the eye socket and the side of the skull to reproduce the correct shape.
- Erase any lines which interfere with the overall effect of your drawing.
- Continue to add farther details and refine the shapes of the main features such as the eye sockets and the nasal cavity.
Progress onto drawing more detail
- As you progress through your cartoon begin to become aware of the forcefulness of a line that you are drawing with. Create space by cartoon darker marks in the front areas and lighter lines in the rear.
- Begin at present to add some of the fine linear details to the areas effectually the eyes and nasal cavity, such as fine cracks and breaks in the bone.
- Equally you begin to draw and use more than and more detail to the primary features, exercise endeavour to get aware of the relative proportions of the dissimilar parts of the skull. For example the teeth concerning the size of the eyes for example.
- Next use a 4B pencil to begin to apply lath areas of shadow onto areas such as the side of the skull, the nasal crenel, and the centre sockets. These areas can be refined at a later stage.
How to Describe a Pirate Skull and Crossbones
- Before you brainstorm drawing the skull, make sure yous leave enough infinite at the bottom of the page to be able to draw the skull with crossbones. With a continuous line brainstorm to draw a basic oval start by the eye. This volition be our chief focus effectually which we will draw an add the form of the skull.
- Progress onto cartoon the centre sockets, ensure that they are symmetrical to each other, to make them appear three-dimensional draw a small-scale line either side which will give this appearance.
- To draw the nasal cavity in betwixt the eyes, draw to thin but sharp looking triangles, join both together to form the nasal cavity.
- The side by side footstep is to draw the cheekbones beneath the eyes sockets, this is done past cartoon lines around the eyes which stop halfway beyond the length of the eyes. The main thing is not in a hurry, but try to make everything exact…
Continue to Add Detail to the Skull
- We now need to begin to schematically describe the rima oris and the lower jaw. This is done past drawing a wavey line below the nasal crenel. Side by side, y'all need to add together some fine details, such as cracking, cavities in and effectually the mouth.
- Draw the teeth every bit shown underneath this line and apply more fine particular.
- Draw cracks on the forehead and begin to draw an approximate location of the intersecting bones below the skull. If you lot depict with a pencil, then y'all always have a risk to erase the lines or shapes that did not turn out.
- We stop with the bones of our skull and continue to the next step.
- Let's become over the details of the skull and bones. Add some curved lines along the edges of the bones.
- Our skull head is almost ready. All we have to do is erase any unnecessary lines. Exercise non forget to add together a bullet pigsty to the skull.
- Here is the final event of our piece of work with you. I hope this lesson will exist useful for beginners who want to learn how to draw.
Why Draw the Skull
It is associated with death or lack of fear of it. This character has actually been used for a long time and not only denote death, vital free energy and concentrated intelligence.
The image of the deadhead is used in Orthodoxy, the then-called "Adam's head," and besides busy with such a pattern on the Halloween room.

How to Sketch the Skull in Stages
- Phase 1 Begin your drawing with a sketch. Outline the silhouette of the head in a turn. Describe a semicircle, then draw the outlines of the lower jaw and highlight the temporal lobe. The front part is divided into ii horizontal lines.
- Stage 2 To maintain symmetry, divide the face with a vertical stripe. Make outlines of the orbits and nasal bones. Make a sketch of the cheekbones and jaws. Describe the details of the temporal lobe.
- Stage three At this phase, it is necessary to draw the teeth and other parts of the jaws. Erase the auxiliary lines and add together additional contours to the main plan in the eye sockets, the nasal bone and the upper airplane of the cheekbones. With the aid of such a flim-flam, yous will achieve volume in your cartoon.
- Step four Dim the eye sockets and the remainder of the internal parts. Depict small pieces.
- Stage 5 At the final pace yous should not hurry, shade, playing with tones, attain the correct transmission of light and shadow. You can use a piece of white paper, and smooth strokes with circular motions.
Depict a Skull with a Pencil
- Images fatigued with a 4B pencil on a white background create a dissimilarity, they are saturated, immediately concenter the involvement of the audience.
- With a solid pencil, make a sketch of the chief features. Draw a frontal bone in the form of a circle, then draw the cheekbones and the lower jaw. Approximately marker the middle sockets and nasal gap, and also describe a strip where the teeth will be. Do not printing on the pencil, considering it is a sketch.
- Draw the temporal lobes. For the image of the eye sockets, draw quadrilaterals with rounded corners, and the olfactory organ tin can be compared to an inverted triangle. Describe pocket-sized parts.
- Utilize a dark pencil to draw all the inner planes and begin shading.
- Add details, for instance, breaks in the bones. Armed with different pencils, put light and shadow and shadow on a horizontal surface.
Related Questions
Skull with Basic
- We already mentioned Jolly Roger in the previous paragraph. It has different variations in its design. The skeleton itself may be full-face or in profile, and the basic may be located below the head, or behind it.
- Outline the silhouette and line upwardly the bones. Draw i vertical and 2 horizontal lines, and then raw the palpebral crevice, nose, and jaw.
- Circle the contour of Roger and the bones. Next gently shade, use different tones of the blackout. Nosotros offer to scout a video lesson.
Skull with a Serpent
- Bear various experiments. For instance, to depict Adam's head with a snake coming out of the sockets, by the fashion, this is a favorite tattoo design.
- The bones principles remain the same. Starting time, make a sketch. Then, in the usual way, describe all the details of the head and draw a ophidian. Pay attention to the correct location of the head of the snake.
Skull with Flowers
- Another famous tattoo art is the epitome of a skeleton with a rose or other colors.
- You lot already know how to draw a skeleton of a head from different angles so information technology volition not exist besides difficult for you. Pay attention to the image of roses. They need to be conveyed well-nigh plausibly, cartoon each petal and adding volume with the help of proper shading.
Skull Tattoo – Pencil Drawing
- Virtually importantly when cartoon or designing tattoos, images of flowers, skulls, and interesting inscriptions well-nigh oft come to mind.
- Of course, the variations are countless, and the number of possible images for tattoos is express only by your imagination.
- As a result, not everyone is prepare to change his own body – for example, some people modify their preferences nigh every mean solar day and are not certain that the cartoon that I liked today will seem pretty tomorrow.
- Merely there is a great manner out – just draw a tattoo yourself, even if non on your own pare, you tin do with a piece of paper.
- So, in this lesson nosotros will try to draw a unproblematic tattoo with a skull and arrows – it looks succinctly, only it is not besides difficult to realize the intended image.
- If you lot are interested in real tattoos more than than merely drawings, and so you merely need to get acquainted with the most heady and relevant data nigh symbols – there you volition detect a lot of useful information.
- The very kickoff phase of drawing a tattoo with a skull is a simple circle of the base. Information technology is non necessary to brand it too neat – it volition be plenty that is just like a circumvolve.
Focus on Drawing Guidelines
- The sketch is divided by a pair of guidelines, which should be relatively light and then – later they will have to exist erased.
- Next, nosotros need to sketch the shape of the skull. This tutorial described in particular the procedure of drawing the skull, then that you tin easily cope.
- The upper role is rounded, followed past protruding sides of the cheekbones and jaw outline.
- The next stage is drawing the "features of the face" of our skull.
- Despite all the closeness to the principles of drawing an ordinary human face up, it all looks very ominous.
- The eye sockets are illustrated on the horizontal guideline, just below – the hole in which the nose is usually located.
- At this step we will bargain with the details – we will add relief and boosted lines that will make the "look" of our skull expressive and frightening, and also draw our teeth.
- Behind our skull, we depict a graphic pattern in the form of an arrow consisting of several lines.
- At the last phase, information technology remains only to pigment over the holes in the skull.
- If y'all want to add a little color, yous can utilise almost any shades, just make sure that the picture looks volumetric.
My Favourite Drawing Resource
General Drawing Courses. I really similarUdemy if yous are looking to develop your knowledge of drawing techniques Udemy is an excellent selection due to its wide range of creative courses and first-class refund policy. They often have monthly discounted deals for new customers, which you can check here.Use my link.
Sketching and Collage. Take a look at this sketching resource I take created.Use this link.
Proko. Is i of my favorite teachers who surpasses in the teaching of Anatomy and Figure drawing. Prokos form breaks down the cartoon of the man body into easy-to-follow components aiding the beginner to make rapid progress. For this,I really similar Proko.
Art Easels. 1 of my favorite ways to draw is by using a cartoon easel, which develops the skill of drawing on a vertical surface. TheH frame easel is an first-class vertical easel way to add variety to the style and type of marks yous create when using a cartoon board.
To see all of my most up-to-appointment recommendations,check out this resource I made for you.
This site is owned and operated past Improvedrawing.com. Improvedrawing.com is a participant in the Amazon Services LLC Assembly Plan, an chapter advertising program designed to provide a means for sites to earn advertising fees by advertising and linking to Amazon.com. Improvedrawing.com also participates in affiliate programs with Clickbank, CJ, ShareASale.
How to Scribble Draw a Portrait
How to Scribble Draw a Portrait How Do you Draw a Scribble Drawing? Scribble drawing is a popular technique that artists specialize in to create a practical and impressive-looking drawing from...
Cross Hatching Techniques: A Detailed Guide
Crosshatching techniques Cantankerous Hatching Techniques Cross hatching techniques are the nearly of import and valuable drawing techniques that you lot'll ever learn. Cross-hatching gives y'all the power...

Source: https://improvedrawing.com/how-to-draw-a-skull-a-step-by-step-guide/
Posted by: keatonpausay.blogspot.com
0 Response to "How To Draw A Skull Step By Step"
Post a Comment